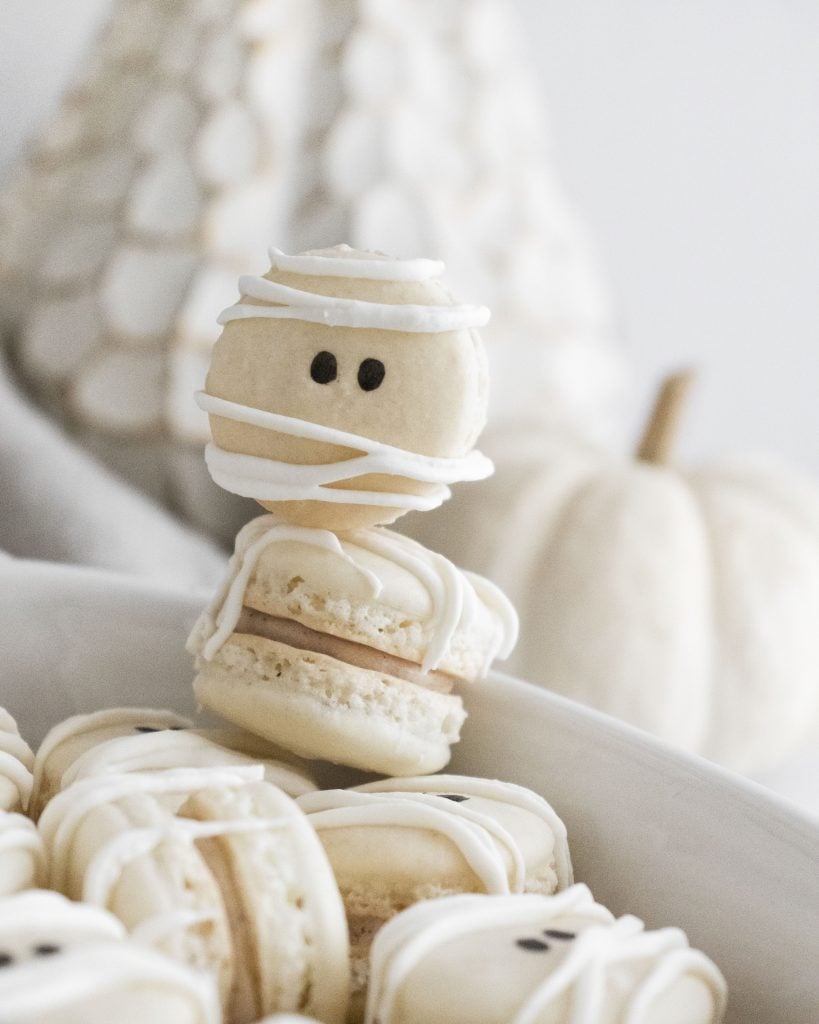
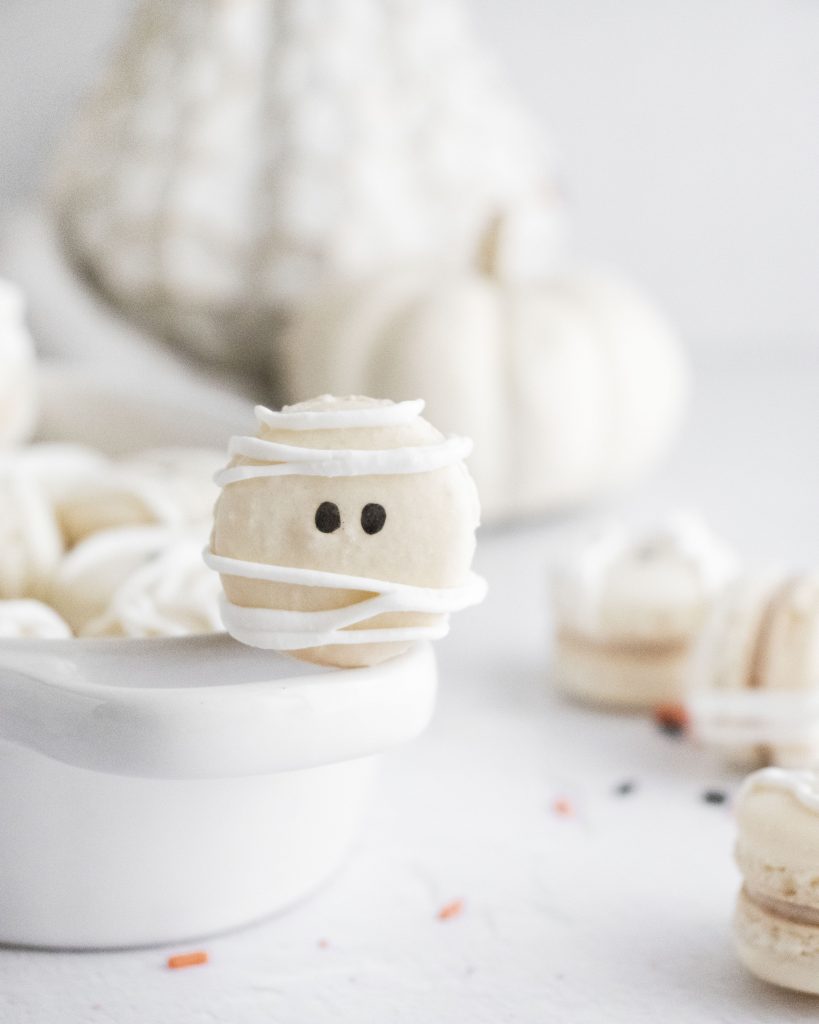
Mummy Macarons #HalloweenTreatsWeek
Mummy macarons are a fun take on the delicate cookie. Full of maple filling, these fall flavored treats are an elegant addition to any Halloween party that both grown ups and kids will love!
This post and recipe was created for #HalloweenTreatsWeek! I was sent samples by some of the sponsor companies but as always opinions are 100% mine.
Sometimes spooky season skews itself to the kids a bit too much.
Sure, all the festive treats for them are fun, but what about the grown ups? Now we can have our cake- er cookies- and eat them too!
These mummy macarons are fun enough to serve to kids but have a little bit more of an elegant appeal so you can whip them up for even the most discriminating foodie in your life.
That way there’s a treat for everyone to enjoy- no tricks about it!
Ingredients
You’ll need 3 sets of ingredients for this recipe: one for the shells, one for the filling and one to decorate the cookies with.
For the Shells
- Powdered sugar– Don’t substitute all granulated sugar.
- Almond flour– Do not use almond meal. It’s different from almond flour. I recommend using Bob’s Red Mill super fine almond flour for this.
- Egg whites– It doesn’t matter if they are room temperature or not.
- Granulated sugar– Just a little granulated sugar.
For the Filling
- Cream cheese– Let it come to room temperature and then whip it.
- Butter– Again, let it soften to room temperature.
- Maple syrup– Grade A will give the best results.
- Vanilla extract– Pure vanilla extract will taste best. Don’t substitute imitation vanilla.
- Cinnamon– Ground cinnamon.
- Powdered sugar– Don’t substitute granulated sugar.
To Decorate
- Candy melts– White candy melts or white chocolate.
- Shortening– Vegetable shortening. You could also use coconut oil.
- Black Food Pen– To make the eyes.
I used Dixie Crystals powdered & granulated sugars in this recipe.
Swiss Method Versus French Method
You can make macarons in a number of different ways.
I use either the Swiss method or the French Method to make macarons.
So what’s the difference?
In the Swiss method, you’ll make a double boiler by boiling a pot of water.
Once the water boils, remove the pot from the heat and place a mixing bowl on top of the pot so the bowl is nestled above the water but not in the water.
Then, you whisk the egg whites and sugar together until the sugar dissolves. Once the sugar dissolves, you can beat the mixture with a mixer until stiff peaks form.
In the French method, you beat cool egg whites and sugar together in a stand mixer until stiff peaks form.
Because you heat the eggs and sugar in the Swiss method, it makes a very stable meringue mixture for the shells. The stability can make it easier to work with and can help a beginner create more consistent results.
However, some beginner macaron makers may prefer the French method since you don’t need to bother with a double boiler.
This makes the prep a bit easier but results in a more temperamental batter.
How to Make the Macaron Shells
Start by sifting together the powdered sugar and almond flour together. Discard any lumps.
After you’ve sifted the ingredients together, set them aside and decide whether or not you are going to make your macarons in the Swiss method or the French method.
If using the Swiss method, whisk the egg whites and sugar together on your double boiler as described above.
However, if you use the French method, skip the double boiler and just add the egg whites and sugar to your stand mixer. Then beat your egg whites and sugar together until stiff peaks form in the bowl of your stand mixer.
Once the egg whites can hold a stiff peak, remove the bowl from the mixer stand and place the fine mesh sieve on top of the bowl.
Pour the powdered sugar almond flour mixture into the sieve and sift it into the egg whites. Discard any remaining clumps. Gently fold the dry ingredients into the egg white mixture.
Once the dry ingredients have been fully incorporated, smush all of the batter against the sides of the bowl and then scrape it down and fold it back together again.
Repeat this 5-6 times or until you can lift the batter with your spatula and draw a figure 8 without the batter clumping.
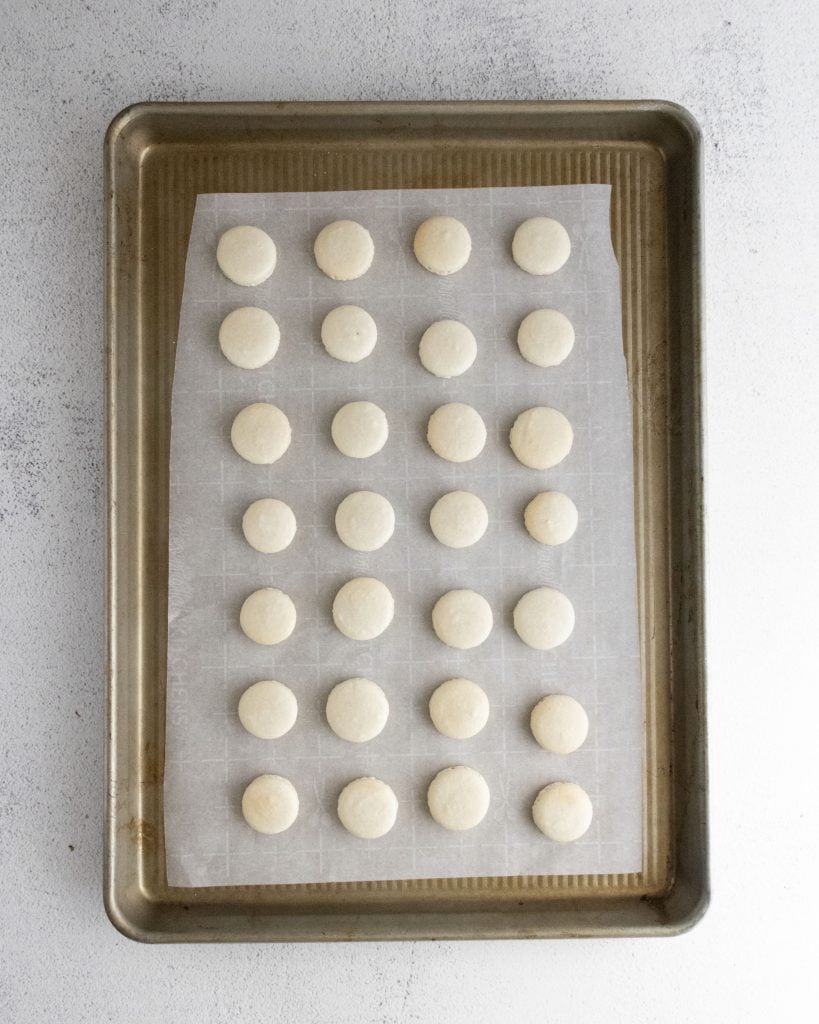
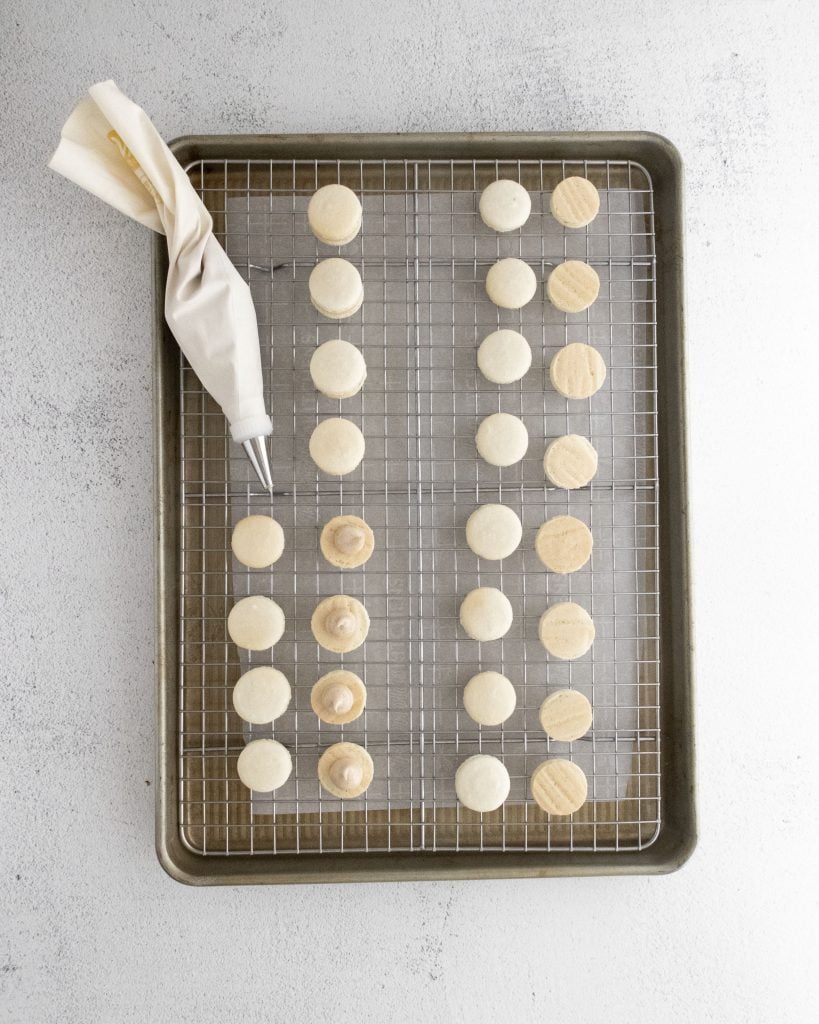
Transfer the batter to a piping bag and pipe 1” circles that are about 2” apart on a parchment lined baking sheet. Then, pick the tray up and gently drop it against the counter to release any air bubbles.
Repeat this until you do not see any large air bubbles remaining.
Allow the macarons to rest at room temperature until they have developed a skin and you can touch the top of the macaron without it sticking to your finger.
Bake the macarons in a 325 oven one tray at a time for 12-14 minutes, or until the bottoms are just starting to turn a light brown. Then remove from the oven and let them cool on the tray.
How to Make the Filling
To make the filling, cream together the cream cheese and butter until it’s light and fluffy with the whisk attachment in your stand mixer.
Then, add the maple syrup, vanilla, and cinnamon and mix again on medium speed until they are completely incorporated.
Scrape down the sides of the bowl with a spatula. Then turn the mixer on low speed and gradually add the powdered sugar.
Once all of the powdered sugar has been added, turn the mixer to high and beat until the filling becomes light and airy. Transfer it a piping bag.
Assembling and Decorating the Macarons
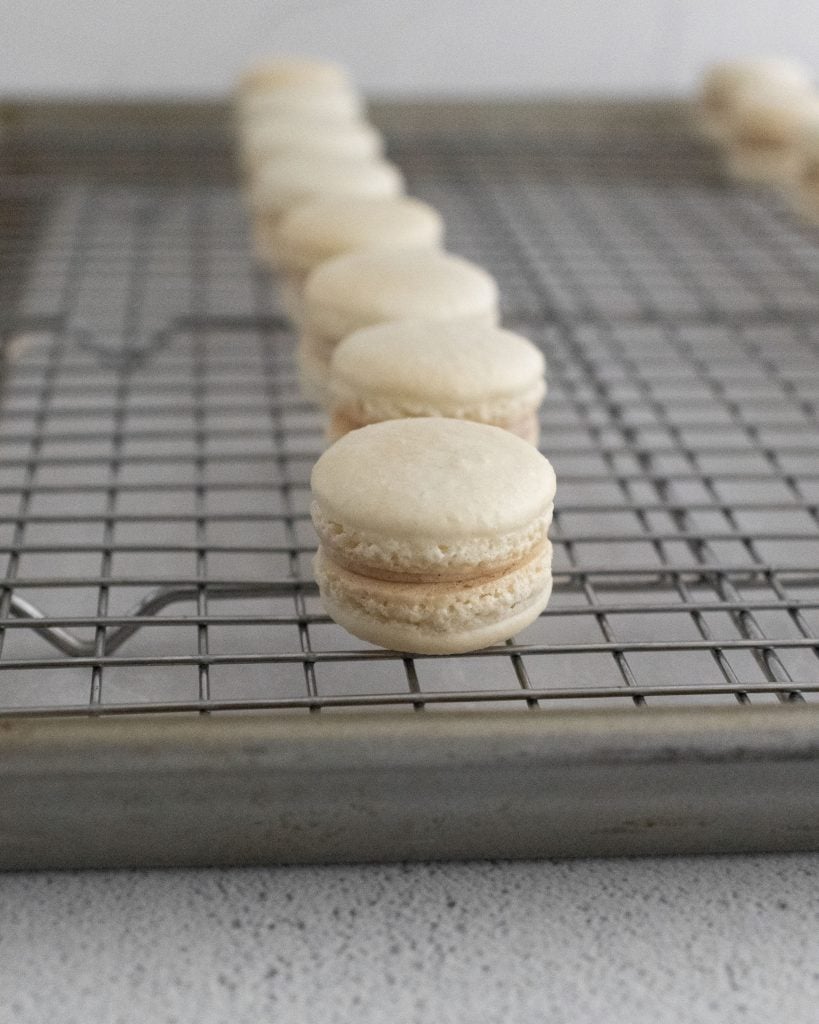
Once the macarons have cooled fully, place them in similar sized pairs.
Then, pipe a small dollop of filling into the center of one macaron before gently topping with the second macaron and gently pressing it down to smush the filling all the way to the edge.
Repeat with the remaining macarons.
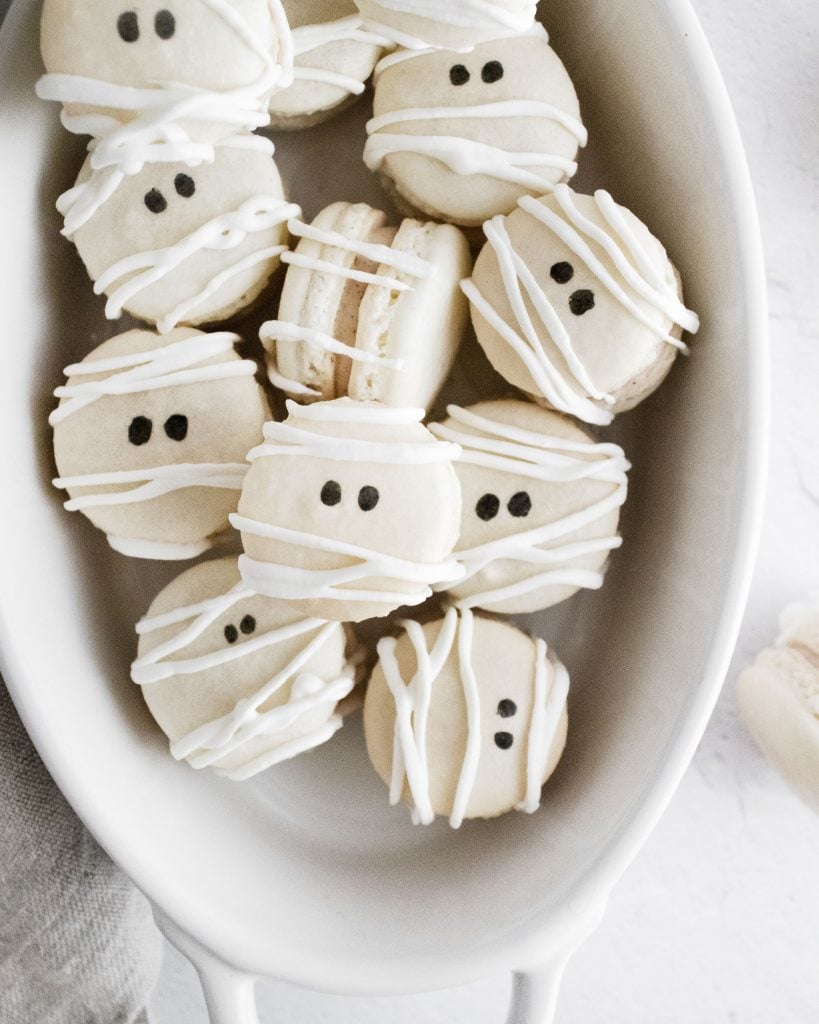
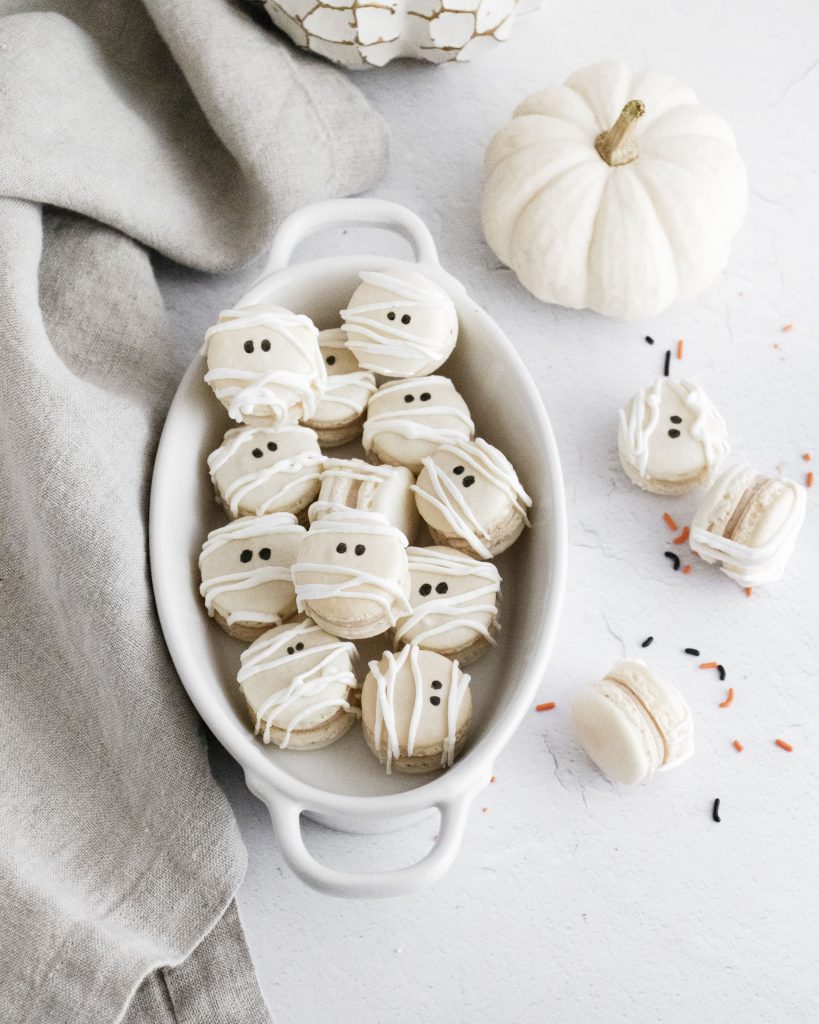
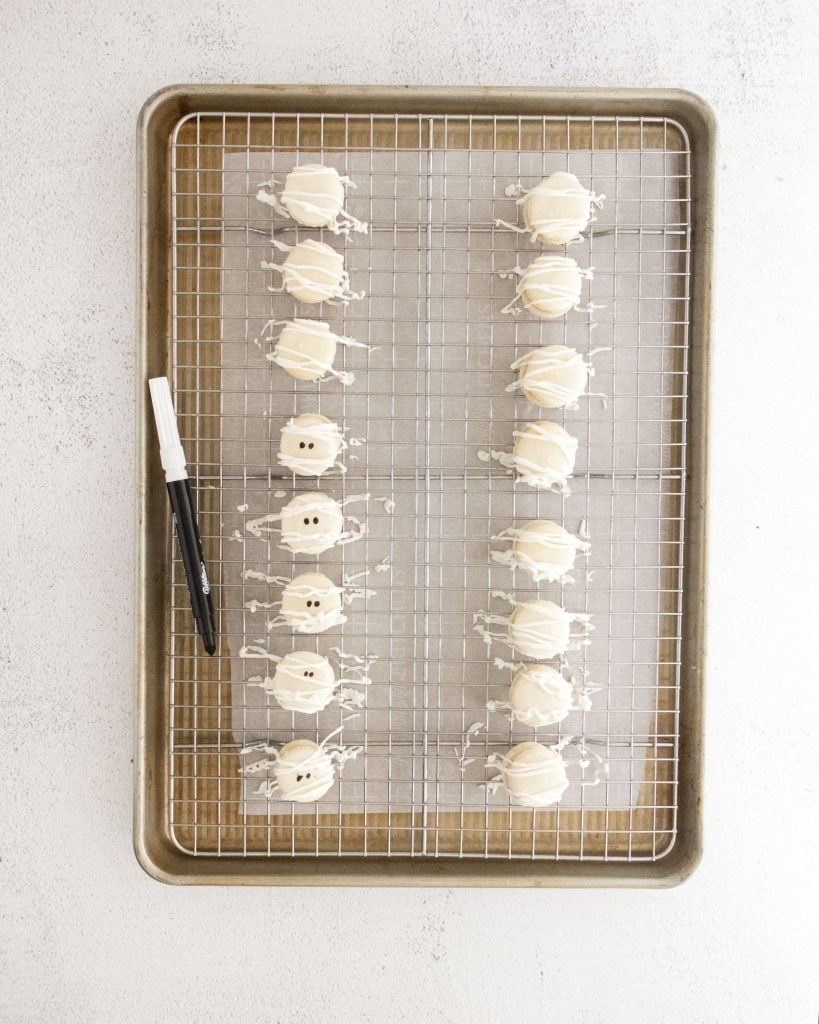
Once you’ve assembled all the macarons, it’s time to make them boo-tiful.
To decorate, melt the candy melts and shortening in 30 second increments in the microwave, stirring after each increment until the candy is melted and smooth.
Then transfer the melted candy to a plastic bag and cut the corner of the bag off. Drizzle the candy over the macarons to create the mummy look.
Once the candy has set, use a food pen to draw on two eyes.
Place the macarons in an airtight container in the fridge to age at least 4 hours. Bring to room temperature before serving.
Macarons can be kept in the fridge for up to 3 days.
Tips and Tricks
- Make sure to use almond flour and not almond meal.
- Don’t skip sifting the powdered sugar and almond flour. You want the shells to be nice and light and sifting helps incorporate air and remove lumps.
- Using whipped cream cheese in the filling makes a lighter icing but standard cream cheese works as well.
- Make sure you are deflating the batter enough. If you don’t deflate enough, the batter will be too thick and your macarons will have peaks whereas if you deflate too much, your batter will be too runny and the macarons won’t rise properly.
- Use an oven thermometer to make sure the shells bake properly. An oven that is too hot will cause the feet on the macarons to spread and result in hollow shells. An oven that is too cold will result in wrinkly, undercooked macarons.
- Let the cooled macarons sit overnight for the best flavor and texture to develop.
Other Macaron Recipes
These mummy macarons will make a scary good treat for any Halloween party. Make some to impress both kids and adults at your spooky celebrations.
Looking for other macaron recipes? Try these:
If you’ve tried these MUMMY MACARONS, or any other recipe on my site, let me know in the comment section how it turned out, we love hearing from our readers! You can also follow along with me on PINTEREST, FACEBOOK, and INSTAGRAM to see more amazing recipes and whatever else we’ve got going on!

Mummy Macarons with Maple Cinnamon Filling
Ingredients
For the Shell
- 1 1/4 cups Dixie Crystals powdered sugar
- 3/4 cup almond flour see notes
- 2 large egg whites
- 1/4 cup Dixie Crystals granulated sugar
For the Filling
- 2 ounces whipped cream cheese at room temperature
- 1 tablespoon butter at room temperature
- 1 tablespoon maple syrup Grade A is recommended
- 1 teaspoon pure vanilla extract
- 1 teaspoon ground cinnamon
- 1 1/2 cups Dixie Crystals powdered sugar
To Decorate
- 1/3 cup white candy melts
- 1 tablespoon vegetable shortening
- Black Food Pen
Instructions
Making the Shells via the Swiss Method (Recommended for Beginners)
- Line two baking sheets with parchment paper.
- Place a fine mesh sieve over a medium sized bowl. Add the powdered sugar and almond flour to the sieve and sift them together. Discard any large lumps that remain in the sifter. Set aside.
- Fill a small saucepan half way with water. Place it over high heat and bring to a rolling boil.
- Add the egg whites and granulated sugar to the bowl of a stand mixer.
- Remove the saucepan from the heat and place the bowl with the egg whites on top. Begin whisking the egg whites and sugar together until the sugar has fully dissolved— about 2 minutes.
- Remove the bowl from the heat and place in on the mixer. Beat the egg whites on medium speed until they hold a stiff peak— about 8-10 minutes with a Kitchenaid mixer on speed 6-8.
- Once the egg whites can hold a stiff peak, remove the bowl from the mixer stand and place the fine mesh sieve on top. Pour the powdered sugar/almond four mixture into the sieve and sift it into the egg whites. Again, discard any remaining clumps.
- Begin to gently fold the dry ingredients into the egg whites. Proper folding technique is to cut through the center of the batter with your spatula and scoop around the bottom of the bowl and flip the batter from the bottom to the top. Turn the bowl 90 degrees and repeat.
- Once the dry ingredients have been fully incorporated, it’s time for the Macaronage stage. Smush all of the batter against the sides of the bowl and then scrape it down and fold it back together again. Repeat 5-6 times, or until the batter reaches the “lava stage”. You could be able to lift the batter with your spatula and draw a figure 8 without the batter clumping. If it doesn’t flow evenly and smoothly, repeat the smushing another 1-2 times and test again.
- Transfer the batter to a piping bag and pipe 1” circles that are about 2” apart on the baking sheet. Once you’ve finished the first tray, pick it up approximately 6” off the counter and drop it straight down to release any air bubbles. Repeat 6-7 more times, or until you do not see any large air bubbles remaining.
- Continue piping the second tray and then drop it to release any air bubbles.
- Allow the macarons to rest at room temperature for at least 30 minutes (up to an hour if it’s humid) or until they have developed a skin. You should be able to touch the top of the macaron without it sticking to your finger.
- While the macarons are resting, preheat your oven to 325F.
- Bake the macarons in a preheated oven one tray at a time— on the center rack— for 12-14 minutes, or until the bottoms are just starting to turn a light brown.
- Leave the macarons on the tray to cool.
Making the Shells via the French Method
- Line two baking sheets with parchment paper.
- Place a fine mesh sieve over a medium sized bowl. Add the powdered sugar and almond flour to the sieve and sift them together. Discard any large lumps that remain in the sifter. Set aside.
- Add the egg whites to the bowl of a stand mixer.
- Beat the egg whites on medium speed (speed 6-8 on a Kitchenaid Mixer) and add the granulated sugar slowly. You should add about 1 tablespoon of sugar and then wait for it to become fully incorporated before adding the next tablespoon. The process of adding sugar should take 2-3 minutes.
- Increase the speed to medium-high and beat the egg whites until they hold a stiff peak— about 4-6 minutes.
- Once the egg whites can hold a stiff peak, remove the bowl from the mixer stand and place the fine mesh sieve on top. Pour the powdered sugar/almond four mixture into the sieve and sift it into the egg whites. Again, discard any remaining clumps.
- Begin to gently fold the dry ingredients into the egg whites. Proper folding technique is to cut through the center of the batter with your spatula and scoop around the bottom of the bowl and flip the batter from the bottom to the top. Turn the bowl 90 degrees and repeat.
- Once the dry ingredients have been fully incorporated, it’s time for the Macaronage stage. Smush all of the batter against the sides of the bowl and then scrape it down and fold it back together again. Repeat 5-6 times, or until the batter reaches the “lava stage”. You could be able to lift the batter with your spatula and draw a figure 8 without the batter clumping. If it doesn’t flow evenly and smoothly, repeat the smushing another 1-2 times and test again.
- Transfer the batter to a piping bag and pipe 1” circles that are about 2” apart on the baking sheet. Once you’ve finished the first tray, pick it up approximately 6” off the counter and drop it straight down to release any air bubbles. Repeat 6-7 more times, or until you do not see any large air bubbles remaining.
- Continue piping the second tray and then drop it to release any air bubbles.
- Allow the macarons to rest at room temperature for at least 30 minutes (up to an hour if it’s humid) or until they have developed a skin. You should be able to touch the top of the macaron without it sticking to your finger.
- While the macarons are resting, preheat your oven to 325F.
- Bake the macarons in a preheated oven one tray at a time— on the center rack— for 12-14 minutes, or until the bottoms are just starting to turn a light brown.
- Leave the macarons on the tray to cool.
Make the Filling
- In the bowl of a stand mixer fitted with the whisk attachment, cream together the cream cheese and butter on high speed until light and fluffy.
- Next, add the maple syrup, vanilla, and cinnamon and mix again on medium speed until they are completely incorporated.
- Scrape down the sides of the bowl and turn the mixer on low speed. Gradually add the powdered sugar. Once all of the powdered sugar has been added, turn the mixer to high and beat until the filling becomes light and airy— about 2 minutes. Transfer to a piping bag.
To Assemble
- Once the macarons have cooled fully, place them in similar sized pairs. Pipe a small dollop (about 1/2 teaspoon, depending on the size of your macaron) of filling into the center of one macaron. Place the second macaron on top and gently press it down to smush the filling all the way to the edge. Repeat with the remaining macarons.
To Decorate
- Add the candy melts and vegetable shortening to a small, microwave safe bowl. Microwave for 30 seconds. Stir.
- Microwave for an additional 30 seconds and stir again. Transfer the melted chocolate to a plastic bag. Cut the very tip of the corner of the bag off.
- Drizzle the chocolate over the macarons to create the mummy look.
- Once the chocolate has set, use a food pen to draw on two eyes.
- Place the macarons in an airtight container in the fridge to age at least 4 hours— if you have the time, aging overnight is preferred and will result in the best texture.
- Bring to room temperature before serving. Macarons can be kept in the fridge for up to 3 days.
Notes
Your egg whites can, but do not need to be at room temperature.
Using whipped cream cheese in the filling makes a lighter icing but standard cream cheese works as well.
There are two things that can help ensure the success of macarons. First, make sure you are deflating the batter only to the lava stage. If you don’t deflate enough, the batter will be too thick and your macarons will have peaks (typically called nipples). If you deflate too much, your batter will be too runny and the macarons won’t rise properly. Secondly, using an oven thermometer is highly encouraged. An oven that is too hot will cause the feet on the macarons to spread and result in hollow shells. An oven that is too cold will result in wrinkly, undercooked macarons.
Nutrition
Check out all of these great #HalloweenTreatsWeek recipes for today
- Pumpkin Piñata Cookies from Big Bear’s Wife
- Blood Splatter Cakesicles from Semi Homemade Recipes
- Jalapeno Mummy Poppers from Jen Around the World
- Halloween Brownies from Devour Dinner
- Candy Coated Strawberry Witches from The Redhead Baker
- Mummy Macarons from 4 Sons ‘R’ Us
- Chocolate Peanut Butter Trifles from Cookaholic Wife
- Monster Mix from House of Nash Eats
- Candy Corn Carmel Thumbprint Cookies from Sweet ReciPEAs
- Pumpkin Spice Marshmallows from Karen’s Kitchen Stories
- Candy Corn Popcorn Balls from Sweet Beginnings
- Deviled Corn from Pastry Chef Online
- Mini Halloween Oreo Cheesecakes from Cheese Curd In Paradise
- Hocus Pocus Billy’s Grave Pudding Cups from I am a Honey Bee
- Hocus Pocus Hot Chocolate from For the Love of Food
Welcome!!! It is almost Halloween which means it is time for this year’s #HalloweenTreatsWeek recipe and giveaway event!!
#HalloweenTreatsWeek is a yearly Halloween blogging event that is hosted by Angie from Big Bear’s Wife & its a creepy and haunting week-long event is filled with some amazingly wicked Halloween treats, recipes and some frightfully fun giveaways.
“When witches go riding, and black cats are seen, the moon laughs and whispers ‘tis near Halloween.”
For the 4th annual #HalloweenTreatsWeek event we have 28 hauntingly talented bloggers that are sharing their favorite Halloween recipes throughout the week!
Follow the hashtag #HalloweenTreatsWeek on social media and look at the bottom of each post to see all of the Halloween recipes that we’re sharing!
Prize #1 from Dixie Crystals
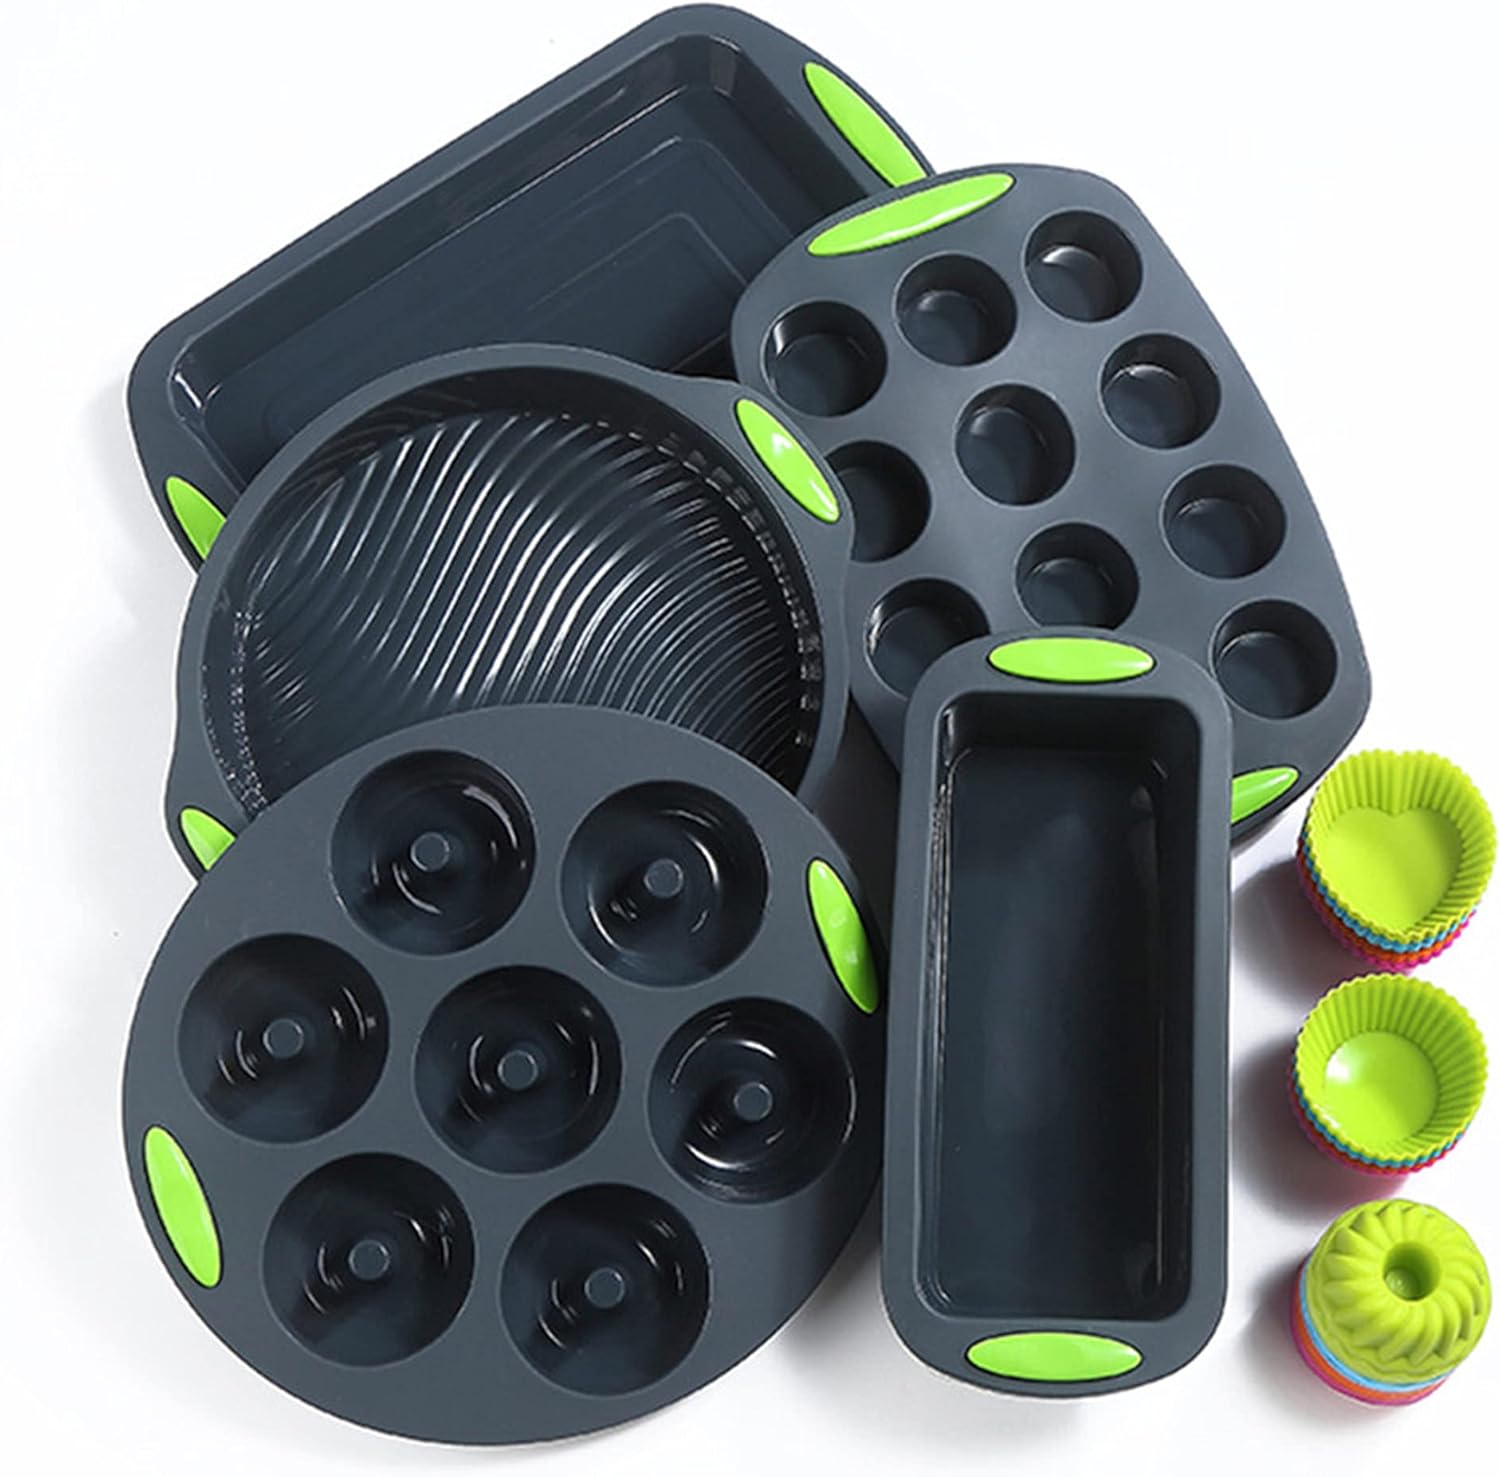
41 Pieces Silicone Bakeware Set
3 Piece Halloween Silicone Spatula Set
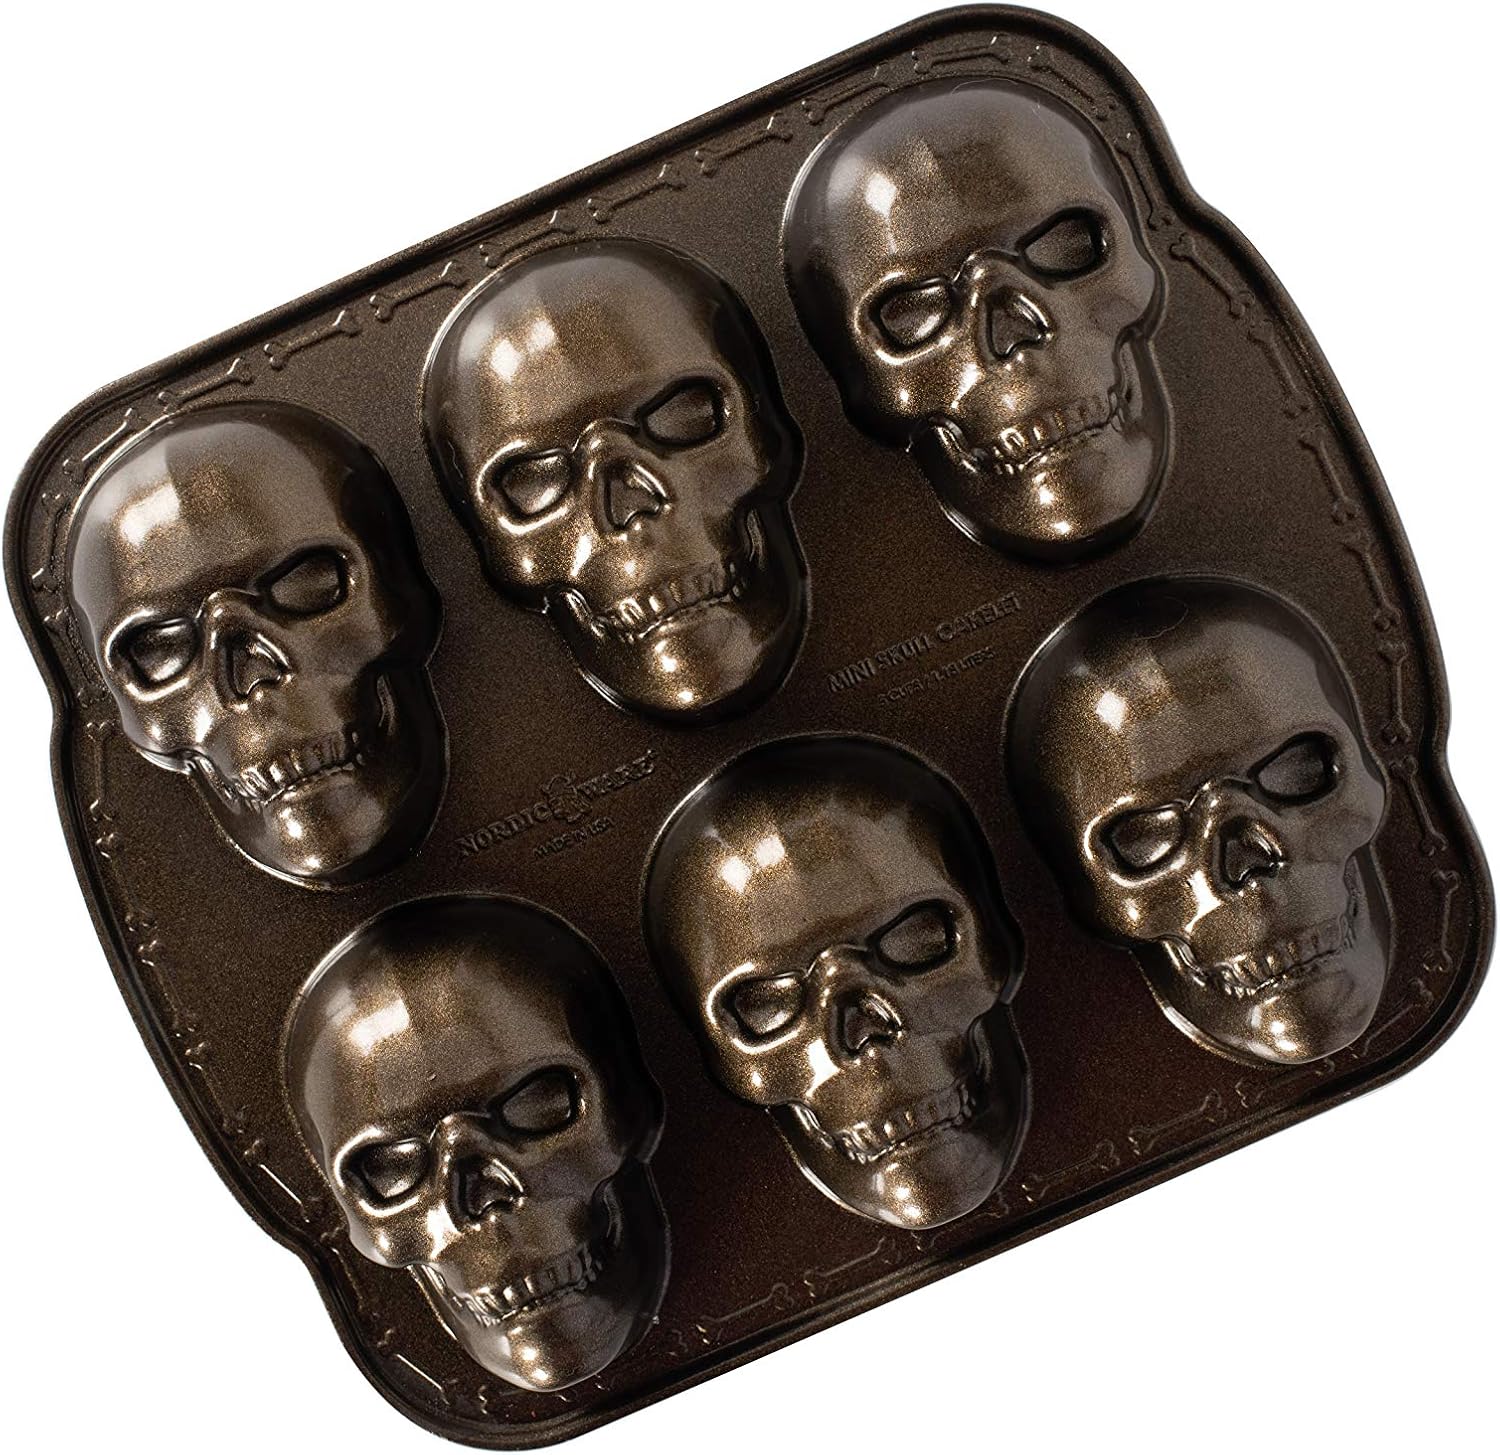
Nordic Ware Haunted Skull Cakelet Pan
Giveaway open to US Residents 18 years or older. All entries will be verified. No PO Boxes Please. Prizes will be sent directly from sponsor to winner, bloggers are not responsible for prizes. This giveaway runs from October 11th – October 15th at 11:59PM EST. Winners will be selected soon afterward and contacted by e-mail. Winners will have 48 hours to respond or a new winner will be chosen. There are a total of 1 (ONE) prize pack and therefore we will have a total of 1 (ONE) winners. No purchase necessary. Void where prohibited by law.
Disclaimer: These posts and recipes are part of the week-long event, #HalloweenTreatsWeek but all opinions are 100% mine! We would like to Thank our amazing brand sponsors: Dixie Crystals that provided a prize pack for our giveaways and also sent some samples and products to the #HalloweenTreatsWeek bloggers to use in their recipes.


These little guys are so cute, and with that maple filling? Sign me up!
What an adorable idea for a spooky Halloween recipe, these mummy macarons are so clever. #FiestaFriday