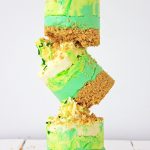
Saint Patrick's Day Mini Layered Cheesecakes
Cheesecake is our favorite dessert, and perfect for any occasion, and the consensus is that everything's more fun in miniature form- so with the help of some food coloring & layering these are the ultimate green dessert to celebrate Saint Patrick's Day complete with a classic graham cracker crust.
Servings: 6
Calories: 785kcal
Equipment
- Stand mixer
- Parchment paper
- Bowls
- Spoons
- Whisk
- Spatulas
- Cookie sheet
- Frosting tip for piping
- Pastry bag - to pipe frosting
- Sheets of Copper mats (or Pastry rings)
Ingredients
FOR THE CRUST:
- 1 sleeve of Graham crackers - crushed in the blender
- 1/2 stick of butter - melted
- 1 heaping Tablespoon of sugar
FOR THE CHEESECAKE:
- 4 - 8 ounce packages of cream cheese - softened
- 1 cup of powdered sugar
- 1 Tablespoon of Vanilla
- 1 teaspoon of lemon juice
- 3 ounce package of Cheesecake flavored Instant pudding mix
- 1 cup of half n half - plus 2 Tablespoons - see instructions
- 1 can of Buttercream Frosting - for topping
- Green sprinkles - for topping
Instructions
- Measure the Copper mats, and cut them in 3 inch high strips. Fold the strips to meet ends, until you have about a 3 inch, in diameter (across) circle. Cut the strip where needed, and leave enough extra to tape the ends of the strip together. Tape the ends of the strip with duct tape, and make sure it's taped securely along the edges. Place the copper circles on a piece of parchment paper, on a cookie sheet. Mix the Graham cracker crumbs, melted butter and sugar together in a separate bowl, and place an equal amount in each copper circle. Tap the crumbs down with the end of a wooden spoon, until they're even and compact in the bottom of the copper circle. Place in the freezer.
- In the mixing bowl of a stand mixer, mix the softened cream cheese until smooth and creamy. Stop the mixer and scrape down the bowl, and mix again. Add the Vanilla, and lemon juice, and mix. In a separate bowl, add the 3 ounce package of Instant cheesecake flavored pudding, and a cup of half n half, and mix with a whisk until the pudding is smooth, and no longer grainy. Add the additional 2 Tablespoons as needed, to make the pudding smooth. When pudding is smooth and thick, add it to the mixing bowl, and blend until completely smooth with the cream cheese. Add the powdered sugar a little at a time, and blend well after each addition. Scrape down the mixing bowl, and blend again. Divide the cheesecake batter evenly between 3 small bowls. In one bowl, add a drop of Aqua green food coloring gel, and stir. In the next bowl, add a drop of Neon Lime colored food coloring gel, and stir. You may need to add two drops of the Neon Lime food coloring gel to get the bright color. Add a drop of the Aqua green food coloring gel into the Lime, and with a knife, swirl the aqua through the lime, but DO NOT STIR. Swirl the Aqua to give this layer the gorgeous colors. In the next bowl, nothing is added, as the top layer is the white cheesecake. For the colors, we used Great Value food coloring Gel from Walmart. If you can't find the aqua food coloring gel, you can mix blue and a small amount of yellow to make an aqua green color.
- Remove the Graham cracker crumbs from the freezer, and add an equal amount of the Aqua colored cheesecake on top of the Graham cracker crumbs, and place back in the freezer. Wait 30 minutes, and take the cheesecakes out of the freezer, and add an equal amount of Lime/swirled Aqua cheesecake on top of the Aqua. Place the cheesecakes back in the freezer for 30 minutes, and then take them out and add an equal amount of the white cheesecake on top of the Lime/aqua swirled layer. Smooth the tops, and place back in the freezer until time to serve. When ready to serve, remove the tape from the copper circles, and remove the copper circles from the cheesecakes, leaving the cheesecakes on the parchment lined cookie sheet. Pipe a swirl of Frosting on top of the cheesecakes, and sprinkle the green sprinkles on the Frosting. Serve and Enjoy!
Notes
If you want to remove the copper circles, and decorate the cheesecakes ahead of time, simply place them back in the freezer until time to serve. When adding the different colors of cheesecake to the copper circles, smooth the cheesecake batter out as much as possible to the edge of the circle, all the way around, so that you have smooth layers when the copper circles are removed.
The copper mats used to form the circles will not stick to the cheesecakes. They are copper grill mats, but we found them to be a good tool for mini cheesecakes. If you have Pastry molds, or stainless steel plating rings, you can use those instead. When you cut the copper mats to form the circles, or rings to form the cheesecakes, you may have pieces that you'll need to tape together to make another circle.
You can also use doubled pieces of Parchment paper to make the circles, and tape them to secure them for the cheesecakes, but we found the copper mats to be substantially sturdier than the paper.
Again, if you have pastry molds, or plating molds, those are usually Stainless Steel, and will work great for the mini cheesecakes, since they're cylinders with no top or bottom, and slide off the cheesecakes easily. Also, you can get silicone cylinders, but we found those didn't hold their shape as well as the others.
FOOD COLORING GEL - you may need 2 or even 3 drops of food coloring gel to get the color in the photos. If you feel your color isn't bright enough, add another drop of food coloring gel until the desired color is achieved.
Nutrition
Calories: 785kcal | Carbohydrates: 43g | Protein: 10g | Fat: 64g | Saturated Fat: 37g | Cholesterol: 201mg | Sodium: 767mg | Potassium: 261mg | Sugar: 38g | Vitamin A: 2409IU | Vitamin C: 1mg | Calcium: 193mg | Iron: 1mg